VR Design and Development Portfolio (Peek-A-Bear)
This portfolio is designed to show the sound-based assets I produced during the course of the Peek-A-Bear project, as well as the process of creating these assets and the in-engine work associated with using them to create effective game-based sound design. This portfolio begins with the final audio assets, divided into sections, then the mixing process through utilising the same audio example in different stages of production, before showing a set of screenshots highlighting the in-engine process. Finally, this portfolio ends with an explanation of my additional role in assisting with in-engine placement of models and textures, alongside timelapsed videos of my work.
Ambient Sounds:
Teddy Sounds:
Interactable Elements:
Sound Design Progress Exemplified:
Peek-A-Boo:
Laughing:
Find You:
Unity Building: Sound Placement
Unity makes the process of sound placement easy through its drag-and-drop design, which allowed me to create sound effects that play when the player is near, play upon certain states, or when objects are interacted with. This did come with lots of issues that needed to be resolved, including the deafening blast of every audio file playing simultaneously when the game launched. Below is a set sequential screenshots highlighting the process of sound design within Unity, along with additional explanations.
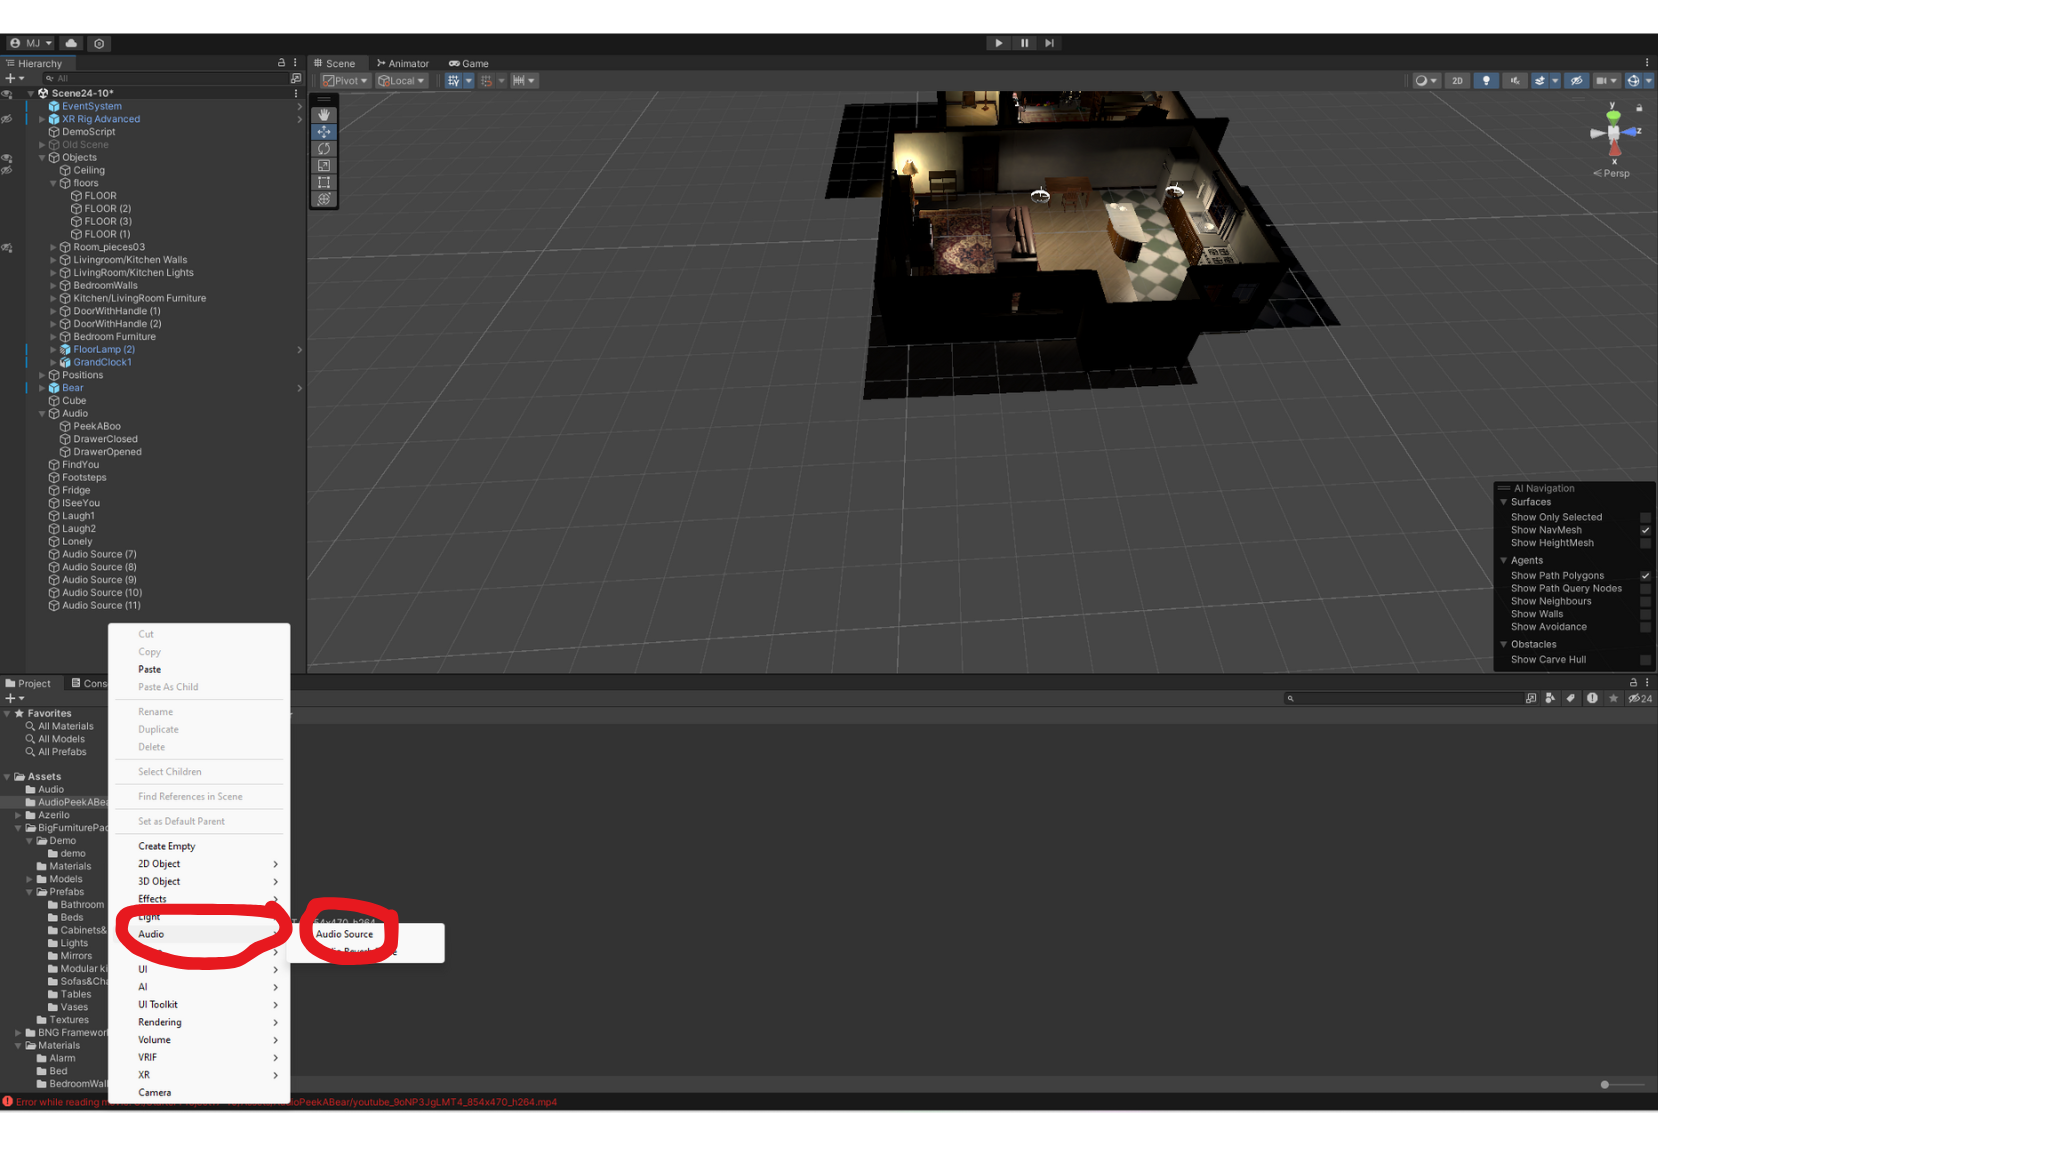
Once The MP3 files have been imported by dragging them into Unity, I created an audio source game object using R click-Audio-Audio Source. The sounds intended for 3D were also ‘forced to mono’ to allow them to work in 3D.
With the newly created audio source object selected, I dragged the corresponding audio file into the ’audio clip’ section- in this case the clock ticking sound effect.
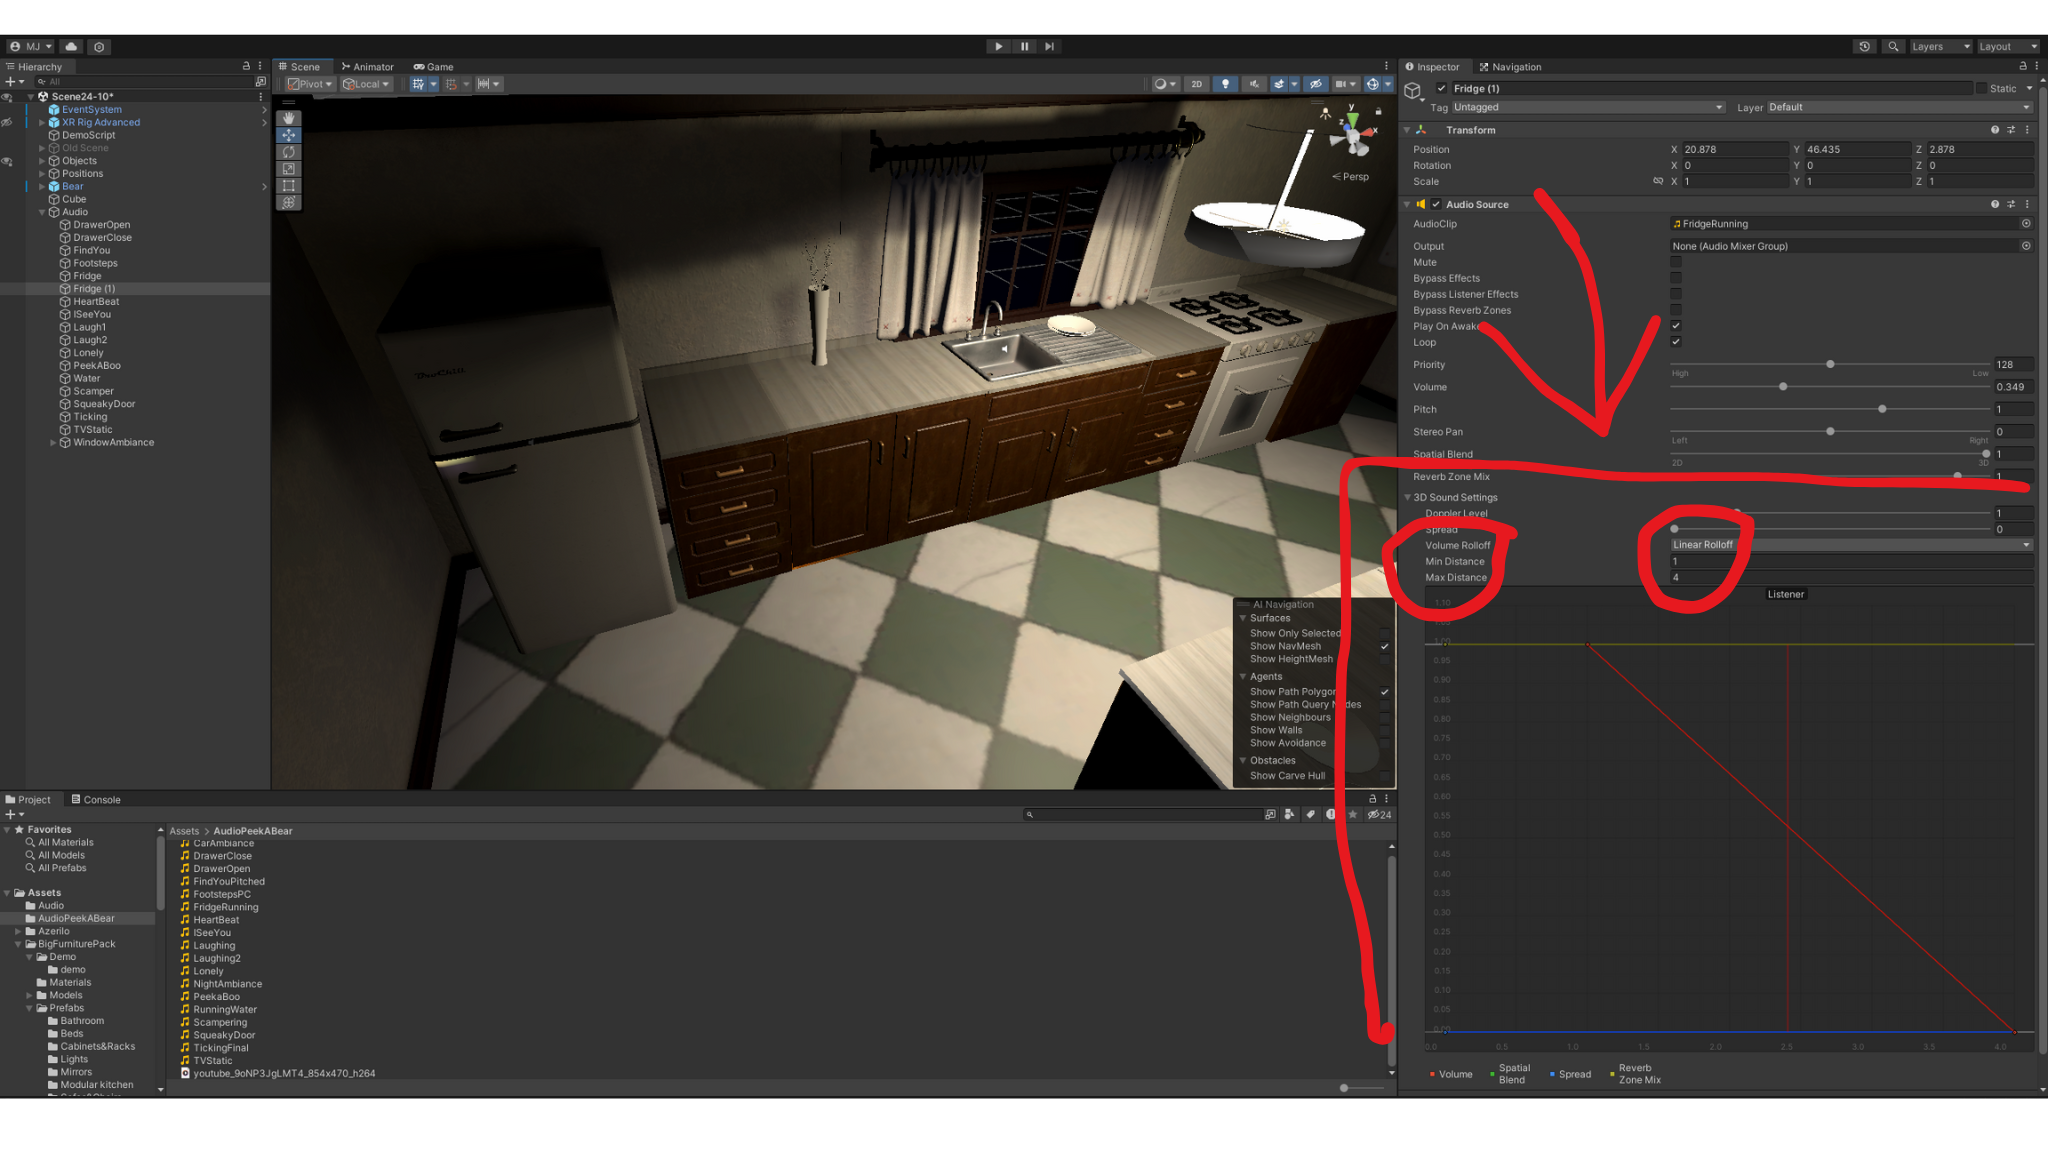
The grandfather clock in our game consistently ticks, thus I enabled ‘play on awake’ (to make sure the sound played automatically), and enabled ‘loop’, which causes the audio file to play repetitively. This audio file was created in Audacity with the purpose of being looped to avoid weird-sounding moments in the audio. Finally, as this sound is location dependant (meaning the player must be near it to hear it), the spatial blend slider was moved fully to 3D.
In this example (the scamper sound effect), the audio is linked to Teddy’s movements. As it acts on a trigger (elaborated on later), this sound does not ‘play on awake’, nor was it intended to ‘loop’, thus both were disabled. This sound is also heard regardless of player location, to not give away Teddy’s location or accidently cause the player to not hear the effect and know that Teddy has moved, thus the spatial blend slider was moved to 2D.
For the 3D sounds, an important step in their Unity placement is the volume roll-off, or the way in which the sound gets louder as you approach the source and quieter as you retreat. For all the sounds, I used a linear roll off, which meant the sounds gained or lost volume at a consistent rate. Unity visualises the point in which the sound can no longer be heard through a wire sphere surrounding the audio source, which was helpful in placement and was used to ensure that sounds were only heard from a realistic space away. This is an element that I would refine and iterate on with additional time for the project.
Some audio files play when their corresponding object is interacted with by the player. In this example, the drawers when opened play two sounds; one when opened and another when closed. This used the preexisting scripting in the original starter project which was applied to our team’s models under sideboard-greendrawer-handle. Files were dragged and dropped into place.
The most difficult element of Unity sound designing was the sounds played when Teddy moved or was seen by the player. Thankfully, my team (and Tristan!), made it as easy as possible for me by having the Teddy script operational and including an events system to allow me to add audio files to these two major elements. For example, to make the ‘scamper’ sound effect play when Teddy moves, I created a new event, selected ‘audio source’, chose the correct audio source, and set the event as ‘play’. Thus when Teddy moved, the game would trigger the audio clip.
This system did mean, however, that I was limited to only having sounds play in the two ways as mentioned above. Originally, I wanted random Teddy lines to play to throw the player off and potentially scare the player despite them not doing anything to trigger Teddy. While many of these sounds were not utilised in the project (although they are fully functional and in-engine!), I was able to get around this problem while still having some extra sounds. To accomplish this, I used audio delays. Rather than playing the audio immediately, a timer begins which plays the sound upon completion, creating the illusion of a ‘random’ event. I used this to make Teddy say “I seeeeeeee you” upon the player looking in Teddy’s direction, only 9 seconds after the player looked at him.
I also used this system to give the player clues as to when Teddy was going to move. When Teddy moves, a 15 second timer starts, which, when completed, triggers Teddy to say “Maybe I’ll have to find you”, implying he is going to move to try and find the player. However, to avoid this audio playing regardless of whether the player found Teddy or not (which was the case originally), I created another event to ‘stop’ the same audio source upon the player looking at Teddy. This stops the timer associated with the audio source, which means the audio clip will not play until 15 seconds after Teddy moves for a second time (unless he is found again, etc).
With so many options in this event system, this is another element that I would have liked to explore more, given more time.
Unity Building: Model and Texture Placement
An additional role I was assigned in this project was as an additional in-engine/level designer. While it was not my main focus, I did assist in placing assets for the bedroom and hallway, working collaboratively with other group members to ensure their assets were conveyed as they intended. I also worked from a rough concept, created in ‘The Sims 4’ for the general placement of assets. After importing the FBX files into Unity, I dragged and dropped the assets into place, rotating them and correctly sizing them where necessary. The below video is a timelapse of my work level designing by placing, sizing and rotating the models for the bedroom and hallway for our game.
Another element I was responsible for was texturing the assets for the bedroom and hallway (as well as some other random pieces for the house). To do this, I took the already generated texture pictures the asset team exported, (the normal, transparency and smoothness), and dragged them into an empty asset folder marked for a particular asset’s texture. I then created a blank material in Unity, and dragged the images into the corresponding surface input map. Once this was done, I dragged and dropped the newly created texture onto each piece of the asset, fully visualising the amazing assets in-engine! Below is a timelapse video of the process of texturing the bedroom and hallway. Please note that some assets were incorrectly exported or otherwise unoptimised, thus some textures were inaccurate at the stage this video was recorded. Additionally, I forgot to change the workflow mode from metallic. We fixed this later.


